Dorset Buttons
- Joyce Gill
- Apr 5
- 3 min read

DORSET BUTTON HISTORY
According to popular history, Dorset Buttons developed from seeing an urgent need. When Abraham Case witnessed his fellow soldiers replacing lost uniform buttons by twisting bits of fabric over a pebble and fastening the unit with thread, an idea formed in his head that he turned into a business. Over time, the cottage industry of button-making took off despite a law that tried to stifle it. By the end of the 1700’s, it is estimated that around 4,000 people, mostly women, were employed making buttons, mostly out of their own homes. Despite the introduction of machine-made buttons, the handcrafted skills of Buttony survived as a heritage craft. (http://www.henrysbuttons.co.uk/history.html)
MY BUTTON JOURNEY
As a needleworker, my interest in buttons started with a desire to add a more decorative element than a plastic button to articles like pincushions and pouches that I had made. The first book that I purchased on the subject was an impressive volume by Gina Barrett called “Buttons: A Passementerie Workshop Manual”. This book was a bit overpowering at first because of the massive amount of information, but it proved to be a wonderful resource later. I then found simpler instructions online and went from there. More recently, I’ve found books by Gina Barrett and Pat Olski that are geared more to beginners in the craft. The booklets “Dorset Ring Buttons” and Zwirnknopf Buttons” (www.ginabsilkworks.co.uk) and “Crafting Thread Jewelry” are my favourites.
DORSET BASICS
Materials- rings, yarn or thread, a needle, and scissors.
The technique is a relatively simple process with five basic steps:
1. Casting – The ring is covered with close Blanket/Buttonhole stitches.
2. Slicking- The ridge of the stitches is gently pushed to the back of the ring.
3. Laying- Evenly spaced spokes are wrapped around the ring and tidied in the centre.
4. Rounding- Starting in the centre, the thread is wrapped around the spokes using Back stitches, spiraling to fill the ring.
5. Casting Off- The thread is secured in the centre back.

VARIATIONS
Browsing through pictures of handmade buttons will quickly show you that the basics given above can be adapted in many different ways. Varying thread thicknesses and colours, as well as changing sizes of the rings, are used to give totally different results. Adding beads or charms, using metallic threads or silk ribbons, favoring pastels or primary colours, grouping spokes together instead of singly, and on and on. I tend to get bored by repetition, so I always have a selection of colours and charms on hand.
ZWIRNKNOPF BUTTONS
A related version of the handmade button was developed in Europe in the mid 18th Century, the Zwirnknopf button (zwirn= thread and knopf= button), sometimes referred to as Shirtlace or Mandala. It grew as a cottage industry, much like the Dorset Buttons. Although similar to Dorsets, the spokes of the Zwirnknopf are wound first and the buttonhole stitches are added later, between the spokes. Flattened rings (like washers) are preferred for these buttons, and because the wraps may slip on the ring, it is a good idea to rub it with beeswax before starting. If you are interested in exploring this variation, I recommend the YouTube video “How to make a Shirtlace Button” by Gina-B Silkworks.
The Zwirnknopf has become my favourite as I find it works up faster and has endless variations. I even like the way the name rolls off my tongue!

CHARMS & BEADS
I love charms, and several companies seem to know that, so I get wonderful emails of specials. My favourite is “Bohemian Findings” out of Montreal. Over the years, they have gotten a lot of business from me, so I’m now trying to use some of my charm and bead stash. I’ve made some pendants with 50-60mm metal rings that use some of the fun charms. As well, I’ve also made some with flag pins for Canada Day.
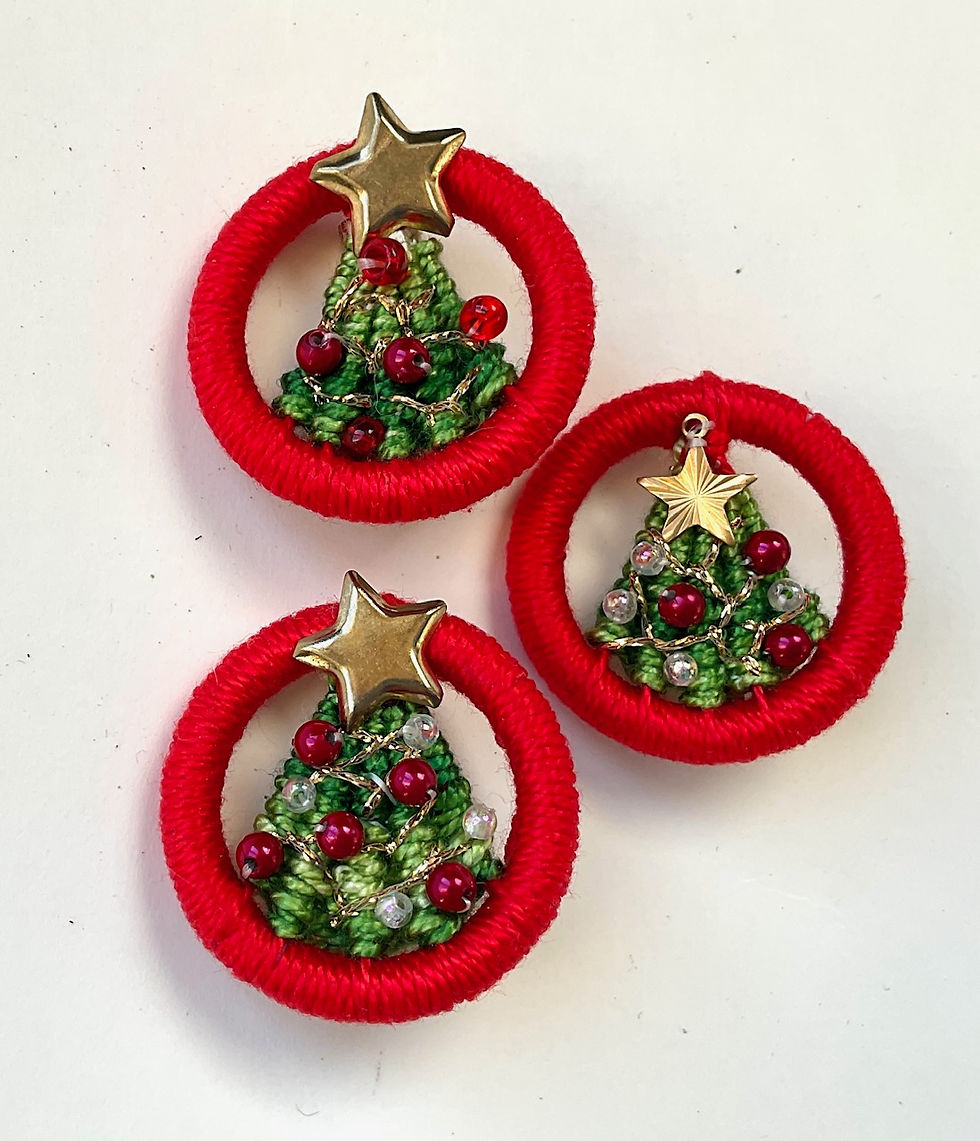
Christmas ornaments and pins are wonderful to make ahead as a small Thank You gift around that time of the year. A simple jump ring and a larger bead can help create an angel, and some tiny beads, a star and some metallic thread make an adorable little tree. This past year, I added pinbacks, and friends were thrilled.
Once I started down the “squirrel trail” of buttons, I realized there was no end to it, from new techniques like Yorkshire and Death’s Head; variations in size, such as miniatures and foot-wide Mandalas; opportunities for using buttons in artworks and wearables; collecting historic buttons, … the ideas were endless! Google, Pinterest, and YouTube have become my friends, and I encourage anyone reading this to have fun exploring, enjoying, creating, and sharing!


Photos by Joyce Gill (Needle Nut)


